Build a Kali Chromebook
- Tactical Capacitor

- Aug 28, 2020
- 5 min read
Most of us who are interested in cybersecurity and hacking at home have probably gone through a good number of iterations of tech (and varying cycles of motivation or lightbulb ideas for conducting projects) through the years. The biggest problem I've found is that without a dedicated, accessible environment to have fun in, the practicality of honing your skills, continuing your projects or just taking the time to go through the tedium of what much of cybersecurity involves, is much harder to do. We've probably all set up Backtrack (the predecessor to Kali), Parrot, Blackbox, Kali, etc. on a VM or even set up a dual-boot system with the intention to use it and end up noticing a 20GB VHD or partition wasting space on our hard drives months later. The problem with those setups is that it takes effort to shut down your main PC that you've probably got 100 Chrome tabs and 20 different apps open on at all times, or boot up your VM and set up all the quirky USB and hardware passthrough and fileshare configurations to get it to be useful against any of the gizmos you want to use it with (or against).

So this is where this project idea came from. A dedicated, thin and light, affordable laptop-form-factor Kali rig to use whenever you want, no special configurations to set up or having to do away with your primary desktop environment temporarily. In the past I'd gone through plenty of alternative ideas to achieve this 'dedicated hacking environment' goal with. It started with me re-purposing an old 11" Alienware laptop (M11x R3) I've used as my backup workhorse for a decade now. That worked, but it's heavy, clunky, slow, has a terrible LCD panel, and even with a recently switched out battery, it's not the best with battery life for its size. But it does run a 64-bit Kali desktop in all its x86 glory, and it definitely still has its place on my workbench.
Eventually I repurposed it again as a Win10 client when I set up a Server 2019 domain at my house to use for oddjobs like being the 'Steam Streamer' PC to hook up to my TV, or the Vuze box. So it quickly became another dual-environment rig I'd have to switch to Kali to when I wanted, and as we know, that just doesn't work. So I decided to create an encrypted Live USB stick with persistence enabled (aka a USB Kali boot drive that saved any changes you made when it was booted, permanently back to Kali so it's not just a temporary session). THIS was to date, the most useful way of embedding Kali on something I'd ever done. Plug it into any machine, any time, pick up right where you left off last time, no special config on the PC necessary, no muss, no fuss. Plus it's portable, and really easy for any lazy mind to go "dang I need a Debian environment" or "I need to test out this new gadget" and go "AH! Lemme grab the thumbdrive". It's so extremely useful.
But it does need a donor PC to boot into it with temporarily. What if you don't have one around? So I thought, Raspberry Pi! I could build a dedicated hacking workbench with the ARM Kali image on my Pi, run it on a 10" screen against the wall, wireless keyboard and mouse, great stuff. But then I realized, my workbench Pi is used for TONS of stuff, far more than just hacking. I needed a general purpose Linux distro, and Kali was a little weird to use for that. So, not the best option. And that's when it clicked. That sweet, streamlined ARM image just needed an all-in-one rig to pair up with. A Pi-like device, with a keyboard, screen and battery built in. So I started looking into Chromebooks (the pre-Intel/x86 Chromebooks, as x86 Chromebooks are apparently notoriously hard to mod and sidestep the BIOS with). They go for crazy cheap since they're all a few years old, get 20+ hours battery life, and weigh 1/4 of what my Alienware did at the same screen size and with a smaller footprint. So perfect, let's do that. But which model?
I came across all the Kali-compatible models and researched each one. Acer, Asus, HP, and Samsung all had some nice and unique models with strengths and weaknesses. Acer's Chromebook 13 with the Nvidia K1 GPU and a nice 13" 1080p display was my finalist along with the Samsung Chromebook 2 (11"). I run a 13" Alienware 13r3 (with eGPU) right now as my main rig though, and I'm in the market for an M11x replacement, so the 13" Acer was just a little too big for my needs. The Samsung has everything you need for Kali and is incredibly thin and light on top of it.
So with that extreme foreword out of the way, let's get to the project. We're going to be transforming a Samsung Chromebook 2 (or any ARM-based Chromebook) into a dedicated Kali laptop. It's not as daunting as it seems at first. So after you've figured out which model you want to grab (you should start here for your research: https://www.kali.org/docs/arm/):
What you'll need for this project:
A PC (Windows, Mac, Linux, doesn't matter) with internet
an empty MicroSD card (8GB minimum, 16GB recommended)
An SD card reader (USB-based or built in to your PC, this is a great model here from Amazon)
A disk imaging software (Balena Etcher is recommended for any OS but I personally use Win32DiskImager as the old standby and you can try it if Balena acts weird)
(OPTIONAL)- To later expand the filesystem if you have an SD card larger than 8GB, you'll need a secondary computer capable of running cgpt (similar to gparted or partitionguru, but in this specific case cgpt is the only app that doesn't make a huge hassle out of the process)
Now, after you've got what you need ready, here are the steps:
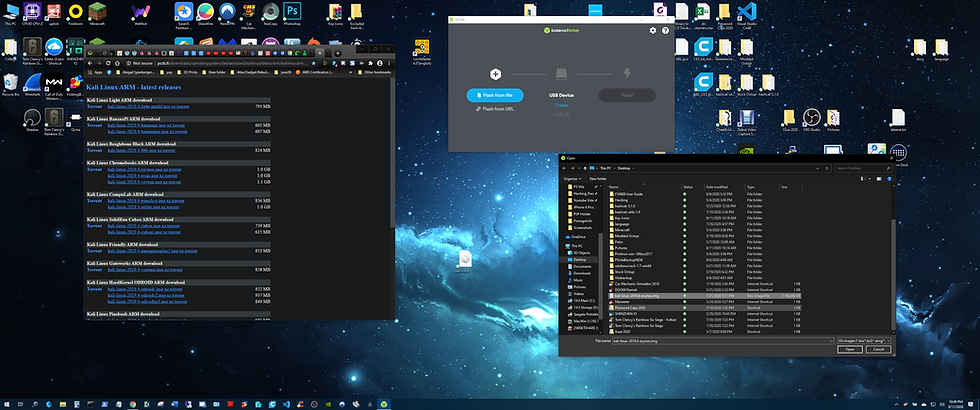
Go to the page below and download the Kali image that's right for your model. The images are named based on the CPU architecture on your laptop, in the case of the Samsung it's the Exynos image: http://www.pcds.fi/downloads/operatingsystem/debianbased/kalilinux/latest/arm/kalilinux.arm.latest.html
Insert your MicroSD card into your PC, make sure the computer recognizes it (and assigns it a drive letter if you're in Windows), and start Balena Etcher.
Select 'Flash from file', then browse for the Exynos Kali image (from step 1) in your downloads folder and select it. Choose your MicroSD's drive, and hit 'Flash!'
You've now got everything you need Kali-wise. Next steps are preparing your Chromebook to boot from the MicroSD. You'll need to put the Chromebook into Developer mode and enable USB Boot using this guide: https://www.chromium.org/chromium-os/developer-information-for-chrome-os-devices/samsung-arm-chromebook#TOC-Developer-Mode
These steps can be finnicky, so feel free to reach out to me and let me know if you have any issues. I'll be happy to go into more detail in this article if anyone wants it or runs into issues with the above link to enable Dev mode.
Expanding file partition:
Walkthrough partially derived from: https://forums.kali.org/showthread.php?36002-resizing-GPT-on-C201PA-chromebook-makes-it-unbootable
1. Get a Linux OS capable of running cgpt and gparted (Raspberry Pi running Raspbian, or Kali system running for somewhere else)
2. Install GParted on your OS through opening a command prompt and entering:
sudo apt-get upgrade
sudo apt-get update
sudo apt-get install gparted
3. Open GParted through searching or finding it in your start bar (under Start>System Tools) on Raspbian
4. Expand the file system through the GUI interface
NOTE: This should be all you would need to do traditionally, but there are a few extra steps involving cgpt and re-introducing the volume flags as everything was reset to 0's when you finished the volume extend.
5. Now run cgpt with this code, making sure to replace 'mmcblk1' with the correct volume of your SD card (to see your volumes, you can use commands in either parted or fdisk, check with commands from here: https://linuxhandbook.com/linux-list-disks/):
cgpt add -i 1 -S 1 -T 5 -P 10 -l kernel /dev/mmcblk1The tutorial I used to get my disk properly expanded using the command above came from here.
Now you can stick your card into your Chromebook, hit CTRL+U and boot right into Kali! Now journey forth on all your hacking adventures on your newly-dedicated hacktop.


Comments