
When the Raspberry Pi 4 came out, I waited for a little while for the kinks to be worked out and developer support to bolster up. One of the biggest problems right off the bat was the RPi4's propensity to heat up. Since then, firmware revisions have come out and helped this problem, but still, under stress heat is definitely an issue to make sure you handle if you're going to push a Pi to its limits.
A good way to push a Pi is with gaming, by making it a Retropie emulator. Systems like the N64, Dreamcast, PSP and Playstation can really put a Pi through its paces.
So as I build Pi's out as bigger and better super-emulators that continually take in more game libraries and increase performance with every Pi revision, overheating was definitely a consideration for my 'gaming' Pi I wanted to make.
Because of this, I found tons of cases that weren't fully baked like previous Pi's yet, and some that really tackled the heating problem with MORE than enough oomph. With all these variations in cooling design, I wanted to find out exactly which heatsink would be the best for what I wanted- and that was a really cool, classy, sleek looking case that incorporated plenty of cooling for the most reliable, high framerate gaming experience on the Pi.
I ultimately narrowed it down to four heatsink variants, with fans being a must but at the same time a no-effort add on (eg. any fan will do the job on a Pi, so I'm not going to test silent, or large, or small, or high-CFM variants). They were:


Below is what they look like from marketing angles:


The results were very interesting. Below I'll outline exactly what happened under load and stock clocks vs overclocked conditions for each variant (with fans and without). For each variant I'll test the stock speed (1.5GHz CPU, 500MHz GPU) under full load without a fan, and then stock speeds with a fan, and then a 2.147GHz (and 750MHz GPU) overclock. For some reason the 2GB RPi4 variants I have won't accept 2.147GHz so I had to drop it to 2GHz to make them boot (I do believe it's a firmware issue but I haven't dug into updating the EEPROM on Pi4's yet).
For the fans, I used a really nice little dual-fan hat for the aluminum and copper tests (as the other 2 types had fans built-in). And for the desktop environment (Raspbian with sysbench) I used for the benchmarking, here is an uncropped screenshot for some context to the rest of the 'results' pictures, along with the configuration parameters and commands I used.

Software Used:
OS: Raspbian (or Raspberry Pi OS)
Benchmark: Sysbench
Screenshots: scrot (tool built-in to Raspbian)
Temp Monitor: System Panel 'CPU Temperature' widget (built-in)
Clock Monitor: System Panel 'CPU Front End Freq' widget (built-in)
Config.txt parameters for overclocks (just add the lines below into your config.txt file on your Pi SD card):
2GHz:
over_voltage=6
arm_freq=2000
gpu_freq=750
2.147GHz:
over_voltage=6
arm_freq=2147
gpu_freq=750
To install Sysbench, just open up a terminal on your Pi's desktop and type:
sudo apt-get install -y sysbenchAnd to run it after install, use:
sysbench --num-threads=8 --test=cpu --cpu-max-prime=20000000 runSo, now on to the tests.
Aluminum Heatsink
First, the aluminum heatsink design. This specific variant is from this package. The case is pretty blah, but it's one of the only offerings I could find with a very oversized heatsink for expanded surface area that still fit the Pi4. I got them even with a case I would probably never use, because in total the whole thing is only $10.60, which is a great price. This configuration did AMAZINGLY well.


So as you can see, without a fan, at stock speeds being stress tested, this config never went above 68c. 90c is the threshold trigger when the Pi4 will start lowering its clocks to compensate for heat generation, and we're nowhere near that. Great results. With a fan introduced, you can see it dropped down to 41c. With a full 2.147GHz overclock, it hovered at 55c with a fan, well below its passive cooling peak at stock temps. All in all, this is a beautiful option.

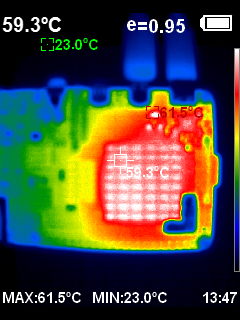


You can also see in the thermal pictures that the oversized heatsink is perfectly sucking up and distributing the heat across the surface area of itself, making it a terrific design for active cooling setups as is seen in the results.
Copper Heatsink
Up next is the copper heatsink design. Growing up building PC's in the early-mid 2000's, I had the idea that because copper was a better material for heat transfer and superior to aluminum. That's actually partially true, except for the fact that aluminum has better heat dissipation, meaning a heatsink made with a combo of both metals would be the best choice. Generally though, you'd imagine copper would show up even warmer on the thermal camera as it's pulling away all that heat.
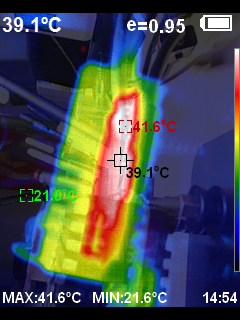
This copper design is in need of a lot of refinement, but they're the type you'll find all over amazon for very cheap, which is why I tested them. If you file down the base and thin out the squared 'fin' design, I think these would do better... but in these tests you'll see some very interesting results that I believe come from the thermal tape inadequacies these sinks come with more-so than the sub-par design of the sinks themselves.


From these results, you can see these are not great options compared to the standard aluminum designs. I'm going to conduct a few more trials with these as the thermal results are so interesting that I really feel an obligation to. You can see 73c with passive (no fan) cooling, which were the worst results of the bunch. With a fan there's a substantial drop to 44c, but still not great results compared to aluminum. Big note here, this is one of the two 2GB models that wouldn't boot at 2.147GHz so this was tested at 2GHz. With the overclock, though, even at decreased speeds, it raised to 58c, which is again not a great number in comparison to the other sinks available.


^These thermal results are probably the most important discovery in this post. I've used these on other IC's of gadgets I build in the past, and noticed the same issues- a cool-to-the-touch heatsink, with almost no evidence of heat transfer showing in thermal images, but I thought maybe it could've been an application error on my part. Now I believe the thermal tape is not doing its job. This is a big deal just because of how many users out there put these sinks on their gadgets and trust they're doing their job, only to possibly end up with overheated or at the very least shortened-lifespan hardware.
Whole Case Heatsink
Now on to another popular design, the sleek 'whole case' cooler, that doubles as a system case and massive heatsink. This was the first heatsink I bought for my Pi4 last year, and since then I've had a few findings that have soured me to the design a bit. First, it obstructs the GPIO pins (especially the ones in the corners where it rounds out around them), making it very difficult to mount any headers or components near, above or around the Pi4 when this sink is installed. I've gotten around this by using an extended header and I shaved off the corners of the header to fit... but it's not a pretty solution. Same goes for the camera and monitor ribbon outputs, the case has slots for them but, phew, if you ever want to unplug or replace or troubleshoot anything connected to those ribbon cables after you install the heatsink, you will not have a fun time getting in there.
Second, these are great passive coolers with how much metal there is to transfer heat to, but are very lacking if you can do with active cooling. One variant of these cases comes in only passive cooling, without any fans, and I think that makes sense. Their fans are mounted to where they have no ability to push air through any surface area, the air doesn't go through any of the (very thick) fins located across the body, and really just direct it to the flat surface that sits above the CPU. They DO help, but there are plenty of more intelligent ways they could've come up with a fan and sink configuration that would perform better (for instance, removing the shrouds from the sides of the fans to allow air to flow sideways through the fins as opposed to strictly downward). I don't mean to bash this too hard as it's still a preferable design to some other sinks out there, but I'm just not a fan at this point. Anyway, on to the results.


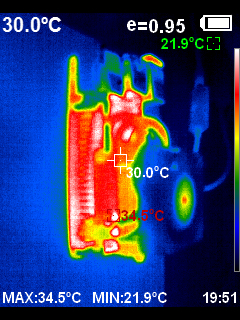
These results netted pretty much what you'd expect from a passive cooler design. It did very well without active cooling at 58c without fans (best results of all 4 types tested). The drop in temps when the built-in fans were turned was was significant as it pulled them down to 50c, but really not impressive or substantial enough to warrant this as an all around 'best design for overclockers'. When the clocks were raised (NOTE: this is the other 2GB model I had, so the OC was set at 2GHz), the temps were raised pretty heavily to 62c, which is above the temperatures at stock speeds even with the fans off. Still within a margin of acceptability, but it goes to show how these fans really don't do as much for the cooler as they could.


The thermals show this case definitely does do its job, but again, not in an optimized way. It's clearly not lapping up a whole ton of the heat from the CPU, but it is transferring some. You can see the main issue with this case and it being really only a good candidate for passive cooling, is how all of the ambient heat pools underneath the heatsink block, preventing air from the fans or even the environment around the Pi to effectively pull away any of that heat. This could lead to decreased performance of the surrounding components on the chipset eventually, especially the already-warm power components in the northwest corner of the board by the USB-C connector (you can see it in all of the previous pictures). The hype from other enthusiasts and marketing surrounding this design in regards to the claim of this "acts as a huge heatsink for better cooling!" are not deserved in my opinion after these findings.
High Performance Tower Heatsink
For the final design, we're testing a new one that's just come out in the RPi 4 generation as the 4 has a reputation for overheating. Never before have we seen desktop-like coolers for the Raspberry Pi, but I guess with it being such a great candidate for retro emulation, the performance/gaming segment of the market has started to demand more from the Pi than was expected in the humble beginnings. This sink looks cool and performs exactly as well as it claims, which is quite a feat.
There is a drawback to these coolers as they are incredibly bulky and you'll have to sacrifice any of your preferred traditional case designs if you want to house this monster, even the low-profile variant (that I'm testing) is several cm's taller than even extended-depth cases allow for. There is a full-height variant that I think is pointless in this case, but may or may not provide very slight performance increases without the added benefit of having a fan pointed toward the board for better airflow. You'll also have a hard time trying to figure out where to put any PiHats such as screens around this thing. It does provide space where the USB/ethernet ports are which is nice if you can finagle a way to mount something in that area, but the heatpipes extend past the Pi's motherboard at the edge where the MicroSD slot is, meaning if you want to squeeze this into a case you'll have to keep that in mind. But if you're looking for serious performance, this is not only a great choice but in my opinion some extreme overkill. You'll see why below.


With the tower installed, the Pi4 barely goes past ambient temperatures no matter how hard you push it. At stock clocks, this runs at 33c... wow. Then, with a full 2.147GHz overclock, it doesn't even break a sweat and rises just 4c to 37c. Unbelievable. This is a truly an impressive cooler. NOTE: I went the whole way with an 'enthusiast grade' application for this configuration, so I actually used Thermal Grizzly Kryonaut thermal paste on this instead of the standard thermal tape it comes with. That may have had an effect, but should be no more than a couple of degrees Celsius. The results convey that this thing is a beast, regardless of what paste is used.


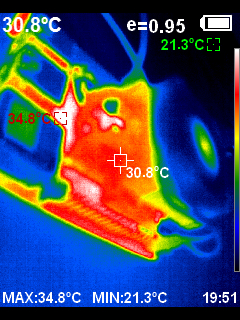
These results show that from heatpipe to fins, there is a very even distribution of heat transfer. The fan is clearly doing its job cooling the fins, and as a bonus the air also gets to end up hitting the block above the CPU and the power component cluster as it runs past the fins, effectively cooling the entire board as well.
Final Thoughts/Winners

All in all, for anyone using a Raspberry Pi for what they were originally developed to be (affordable all-in-one ARM-based computers for learning, tinkering designing and developing hardware on), I would consider the oversized aluminum heatsinks the clear winner. They deliver great all-around performance and don't inhibit any of the accessibility to the components on the board a user will need to get to (from GPIO pins to height clearance for PiHats to port access), and maintain a form factor that will let you put them in any case you want.
If you're an eccentric enthusiast that wants the best for the sake of it, definitely go with the tower cooler. You can live with the peace of mind that no matter what you throw at your Pi, heating will not be a bottleneck in your quest for performance.
If you'll be using this for more of a Kodi or home theater-type setup and really don't want any ambient noise (from things like cooling fans) in the room with you, the whole-case option is probably your best bet there, but there are nicer looking designs that aren't as intrusive (like this FLIRC case that's also a heatsink+case combo).
I recommend staying away from the copper heatsinks as we can see they really under perform, but otherwise as long as you install some type of cooling on your Pi4, temperatures shouldn't be a big worry for you. Hopefully you found this article as interesting as I did! Thanks for reading.